Showing posts with label DIY. Show all posts

Wednesday, December 11, 2013

NYC Crayon Skyline

If you're reading this post you may have seen my previous crayon art, the melted Seattle skyline. My cousin's wife saw it and wanted a New York one to give my cousin for his birthday....It was either New York or Las Vegas and I wasn't so sure I'd be able to melt all the intricacies of the Vegas skyline! So I attempted to make a melted New York...what do you think? I figured if I could get the World Trade Center and the Chrysler Building then it would be recognizable as New York City :)


As my brother said, "It's New York, circa 2000." :)

Saturday, November 9, 2013

Preschool Thankful Trees

What are you thankful for? Most of us would quickly say our family or friends, or maybe our home. But what if we think a little further. Are you thankful for your heater? running water? a soft bed? food in the fridge? The best way to think simply about thankfulness is to ask a 3 year old. This month in my classroom we have been focusing more on thanking God for our blessings since Thanksgiving is coming up soon. We find ways to be thankful year round during our chapel time and by praying before meals but now it's specifically part of our curriculum.

My favorite kind of art project is one where the kids get to personalize it in their own special way. For this project I asked them what they were thankful for...(in a variety of ways so they would understand, because I know thankfulness can be a bit abstract for a preschooler.) The other preparations for this craft included cutting out leaf shapes from magazines and brown rectangles for the tree stump. Overall a very easy craft to make, and if you have older kids they could cut out their own leaves!


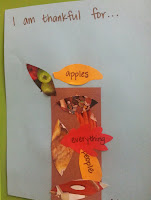
My favorite is the one that says, "Mommy, Daddy, God, Jesus, and Mickey Mouse" :)

Sunday, November 3, 2013

Clothes Pin Christmas Card Wreath

How do you display your Christmas cards? Do you tape them to the stair railing? Throw them in a basket? Magnets on the fridge? Last year I put ribbon around my kitchen cabinets and used mini clothes pins to hold the cards in place. I liked that all right, but I'm always looking for new ways to be creative. A few weeks ago I was inspired by {of course} the one and only Pinterest. I found this wreath made out of clothes pins to hold Christmas cards so I thought I would give it a try... I was originally inspired by Craftiness is not optional but I ended up doing a few things differently.

 First, I painted all my pins with acrylic craft paint in red, green, and white. After letting them dry I wanted a little something more so I added stripes to the white pins and polka dots to the red ones. After that I found a wire hanger and {mostly} bent it into a circular shape. Then I put the clothes pins on the hanger and sealed the ends of the hanger with my handy glue gun and added some ribbon to cover the leftover wire.

Ta-Da! My final product. What do you think? Overall I'm happy with how it turned out. Now to put it away for a few more weeks until I start getting cards in the mail!

Sunday, May 12, 2013

A melted skyline

Last summer I decided to make some melted crayon art for my office at the daycare. Well, I no longer have an office, but the art is hanging up in my classroom now. One of my moms noticed it a few weeks ago and suggested that I make more to sell at the upcoming school auction and carnival. I suggested it to my director and she wanted to know if I could somehow make it go with the Seattle theme...so I set out to make a Seattle skyline...using melted crayons!
All my supplies: canvas (16x20), crayons, glue gun, hair dryer, tape, and a picture of the skyline.
It took a while, but I finally got a taped off version of a Seattle skyline.
For more specific directions on how I melted the crayons, you can check out my previous blog post here. This time it took about 45 minutes to melt the crayons and get all the area covered, but I think it was worth it! (the wax did melt through the tape in a few places, but I fixed that problem with a bit of white paint)

Drum roll please.......

Ta-da! What do you think? Anyone have a suggestion on how much we should sell it for?

Monday, August 1, 2011

DIY: Paint Chip Calendar

So I saw this calendar on Pintrest from Hey, things change! and I thought hmmm I could do something like that. This calendar was done on a big notepad so you would have to make a new one each month- I thought that would be a lot of paint chips and quite the commitment to always making a new one every month. SO I decided to make one inside a frame and use the glass like a white board to write the numbers and what-not on it.

Here's what I did:
Gather supplies: paint chips, paper cutter, tape, ruler, empty frame (16x20)
Cut paint chips apart
Outline each chip with a black sharpie
Lay out the paint squares to make sure you have seven columns and five rows
Once you have an idea of where they will all go, tape away!
I used stamps for each day of the week- Sun, Mon, etc.
The finished product!
Now all I need are some dry erase markers to fill in the dates and what's happening! Although it took me a few hours to complete the whole thing (it would have been done quicker if I was less OCD about perfection in crafts) I think it was totally worth it. It's a little more fun than the white board calendars you can buy at the store and much cheaper! (since I already had all the supplies, minus the paint chips- which I picked up at Lowes this morning). I'm excited because it should go quite nicely with the duvet cover and pillow I picked up at IKEA for my room this year :)

I love Pintrest and have spent so much time looking at blogs with cute crafty ideas, yet I haven't really made anything I have seen. I always think "ohh I should do that someday..." and then nothing. So I am making a goal to be more crafty and try more of the recipes I find too. We shall see how that goes...